2 ways to sidechain in FL Studio
This tutorial will show you how to sidechain using FL Studio.
The easiest way to explain sidechaning is to actually hear it, however if you require an explanation, it is basically used to "duck" certain sounds (bass-lines for example) in order to have other sounds more defined (kick for example). If you want to hear one of the best examples of sidechaning in action, just listen to some of the music by deadmau5.
Example 1: sidechaining in FL Studio 9
Sidechaning has been greatly improved in FL Studio 9 over the previous versions. It takes less time and fewer steps to achieve this task (just compare it to the long version of the tutorial for older versions of FL Studio, following this one).
Step 1: Start a new project and insert Sytrus
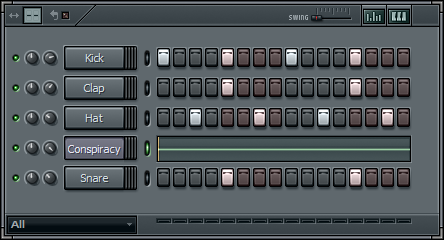
After you start FL Studio, you should get a "Step Sequencer" that looks something like the image below. Setting your Beats Per Minute (BPM) is optional, however I usually begin working at around 124-126 range. Right click on any of the buttons (Kick, Snare, Clap, Hat) and insert a Sytrus.
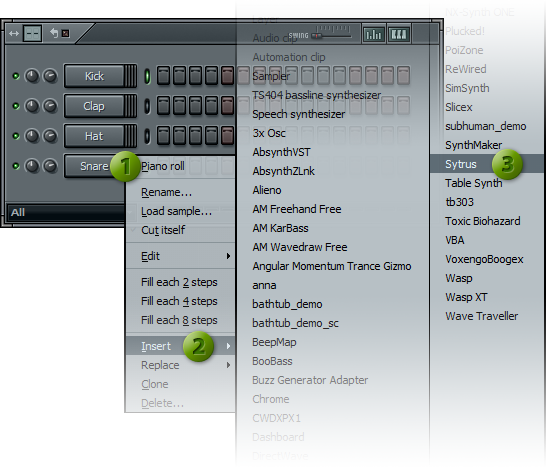
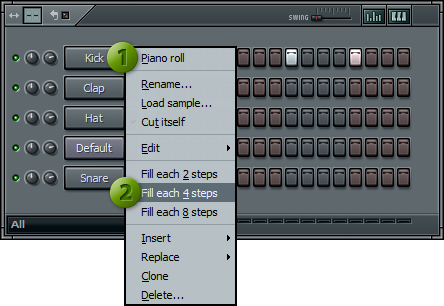
Step 2: Insert a Kick and select your bass-line
Right click your Kick button and select "Fill each 4 steps" (or simple click on the 1st step of each one of the 4 bars)
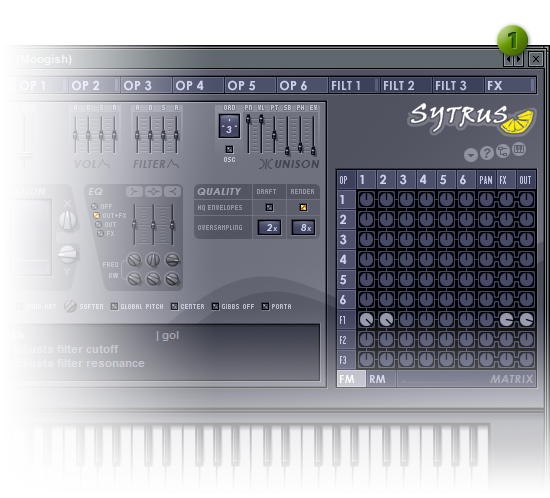
Click the Sytrus button (purple one), and find a preset called "Conspiracy". You can do this by either clicking through your entire preset collection using the 2 small left and right arrows located on the top right corner, or by simply right-clicking them with your mouse to get the entire collection overview. It is best to use a preset with long hold time.
Step 4: Create your bass-line inside your Piano Roll
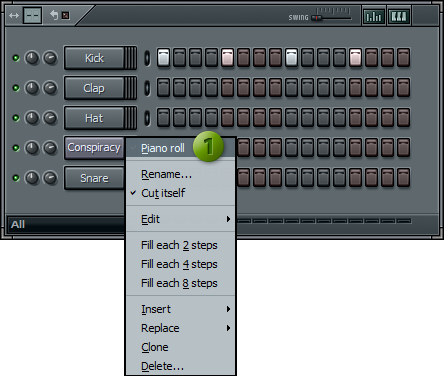
Right click your Sytrus button and select "Piano Roll". This should open up your Piano Roll window.
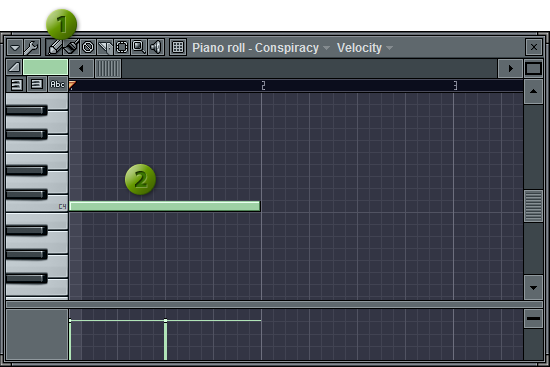
Using the "Pencil" tool (or Brush tool), "pencil in" your bass-line as shown below:
Step 6: Apply Fruity Limiter to your bass-line
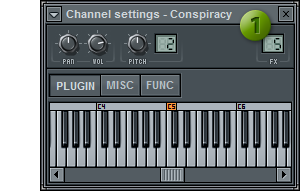 Start off by linking your bass-line to Track 5 of the Mixer. Click the Sytrus button inside of your Step Sequencer. This will bring up 2 windows: Sytrus and a "Channel settings" window. If you do not see the 2nd window, chances are it might be hiding under the Sytrus window. Simply move Sytrus out of the way.
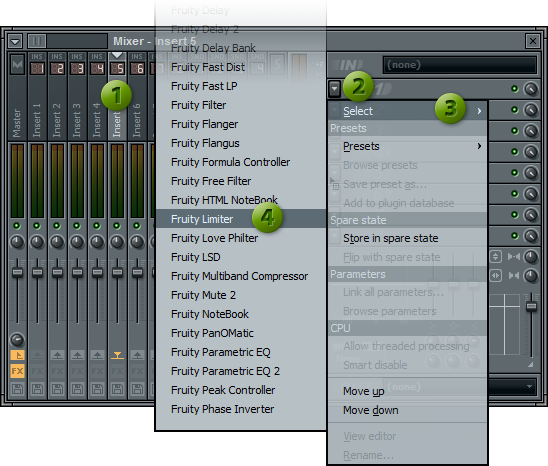
In the top right corner, change the Target mixer track to 5 (click and hold, while moving the mouse up). Open up your mixer (F9), select Track 5 and from the menu choose "Fruity Limiter":
Step 7: Sidechain the bass-line to the kick
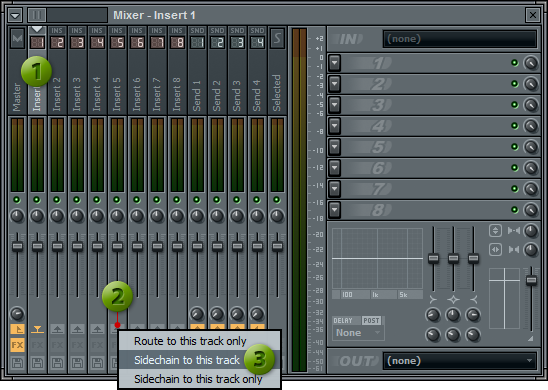
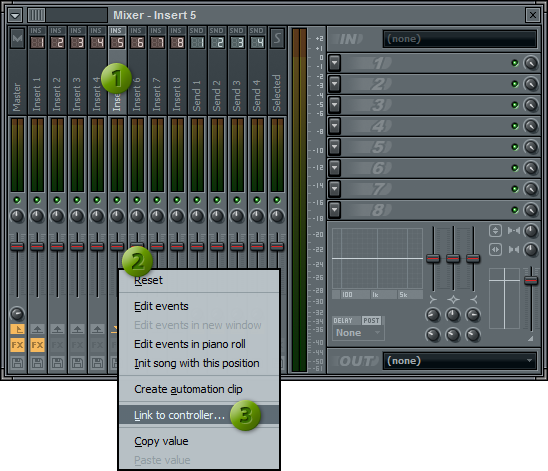
Make sure that you have Track 1 selected in the mixer. Right click the little arrow, right above the "FX Enable" button and select "Sidechain to this track":
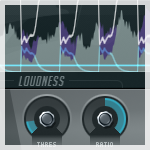
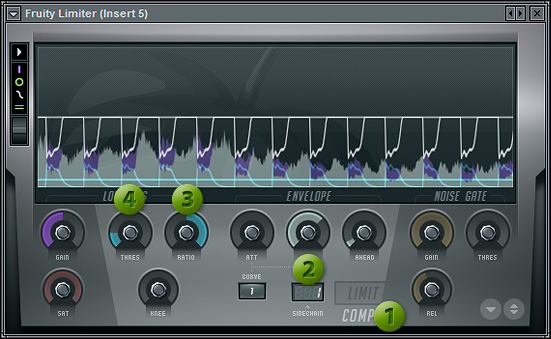
Step 8: Set up your Fruity Limiter
Open up your Fruity limiter that you have applied to the bass-line in the earlier step. Set the target to Comp (Compressor). Change the "Sidechain input number" to 1. Move the "Comp ratio" all the way to the right and "Comp threshold" as show on the image below.
You are done. Play around with the Compression Threshold to get more (or less) defined sidechaining. Loop without sidechaining | Loop with sidechaining
Example 2: sidechaining (the long way) in earlier versions of FL Studio (up to version 9)
Step 1: Start a new project and insert Sytrus
After you start FL Studio, you should get a "Step Sequencer" that looks something like the image below. Setting your Beats Per Minute (BPM) is optional, however I usually begin working at around 124-126 range. Right click on any of the buttons (Kick, Snare, Clap, Hat) and insert a Sytrus.
Step 2: Insert a Kick and select your bass-line
Right click your Kick button and select "Fill each 4 steps" (or simple click on the 1st step of each one of the 4 bars)
Click the Sytrus button (purple one), and find a preset called "Conspiracy". You can do this by either clicking through your entire preset collection using the 2 small left and right arrows located on the top right corner, or by simply right-clicking them with your mouse to get the entire collection overview. It is best to use a preset with long hold time.
Step 4: Create your bass-line inside your Piano Roll
Right click your Sytrus button and select "Piano Roll". This should open up your Piano Roll window.
Using the "Pencil" tool (or Brush tool), "pencil in" your bass-line as shown below:
Step 6: Apply Fruity Peak Controller to your Kick pattern
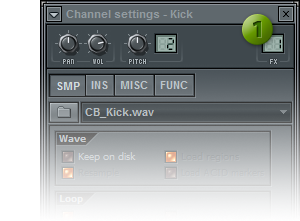
Left click your Kick button. You will get the following "Channel Settings" window. By default, your kick pattern will already be linked to the 1st mixer track, however if it's not or you would like to change the Mixer track, simply click and hold inside the little window while moving your mouse either up or down. I will leave mine set to 1.
Once that is done, you can either double click inside your "FX" window (where it says "1") or press F9 on your keyboard to view your mixer. Make sure that you have the correct Mixer track selected (you need to have track 1 highlighted, if it is, then on the menu to the right (inside the Mixer), click on the 1st FX slot. From the menu, select Insert > Fruity Peak Controller.

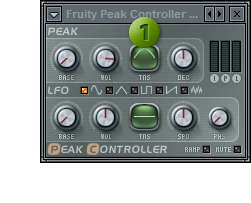
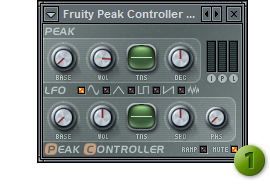 Once in Peak Controller, click the "Mute" checkbox. This will un-mute the Controller so you can actually hear the kick (not even sure why it's enabled by default).
Step 7: Linking your bass-line to the Peak Controller
Click the Sytrus button inside of your Step Sequencer. This will bring up 2 windows: Sytrus and a "Channel settings" window. If you do not see the 2nd window, chances are it might be hiding under the Sytrus window. Simply move Sytrus out of the way.
In the top right corner, change the Target mixer track to 5 (click and hold, while moving the mouse up).
Open up your mixer (F9), select Track 5 and right click on the Volume control bar. From the menu, select: "Link to controller..."
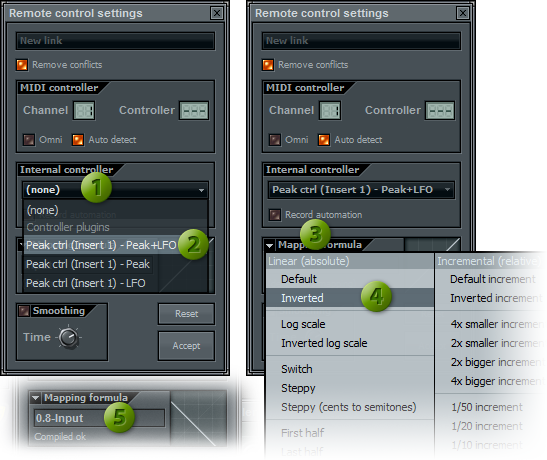
In the "Remote control settings" that just appeared, change "Internal controller" to "Peak ctrl (Insert 1) - Peak + LFO" and change the "Mapping formula" to "Inverted". In the Mapping formula window type in the following formula: 0.8-Input, where 0.8 equals to 80% of the Volume for the bass-line.
 Step 8: Final touches/configuration
Open up your Peak Controller and drag the "peak tension" all the way up to 100%. This will greatly depend on the type of sound you are using, so just play around with the setting.
Add in the Clap, Snare, High Hat and set their volumes to 65%, 35% and 30% respectively. . Again, this is entirely up to you. You should have something that looks like this:
Finally, open up your mixer and insert "Soundgoodizer" on the Master track. This will make everything sound much better. The end. Pretty long as you can tell...
Here is my example of what we have worked on in this tutorial (after a little bit of tweaking): Loop without sidechaining | Loop with sidechaining